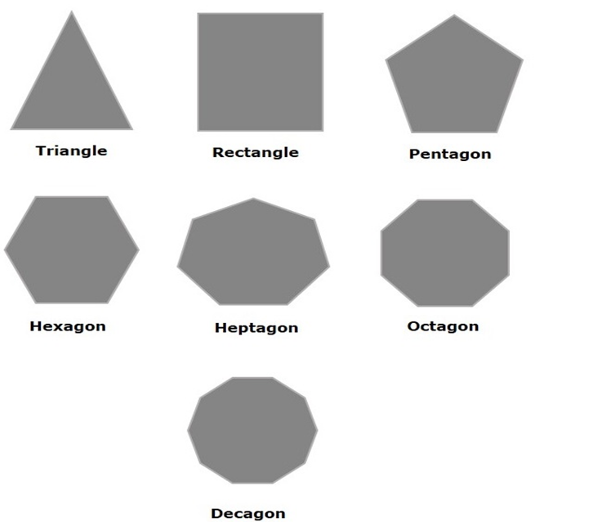
Polygon is geometrically defined as a closed shape formed by a number of coplanar line segments connected from end to end. The name “polygon” is derived from the Greek words, “poly” meaning “many” and “gonia” meaning “angles”.
A polygon is described by two parameters, namely, the length of its sides and the measures of its interior angles.
There are various types of Polygons based on the numbers of sides and angles. They are listed below −
- If a polygon has three sides, then it is referred to as a triangle.
- If a polygon has four sides, then it is known as quadrilateral. Shapes like rectangles, squares, parallelogram etc., are all types of quadrilaterals.
- If a polygon has five sides, then it is known as a pentagon. Similarly, the polygon with six sides is called hexagon, seven sides is heptagon, eight sides is octagon etc.
Polygon in JavaFX
In JavaFX, a polygon is represented by a class named Polygon. This class belongs to the package javafx.scene.shape.
By instantiating this class, you can create a polygon node in JavaFX. You need to pass the x, y coordinates of the points by which the polygon should be defined in the form of a double array.
You can pass the double array as a parameter of the constructor of this class as shown below −
Polygon polygon =newPolygon(doubleArray);Or, by using the getPoints() method as follows −
polygon.getPoints().addAll(newDouble[]{List of XY coordinates separated by commas });Steps to Draw Polygon
To draw a polygon in JavaFX, follow the steps given below.
Step 1: Creating a Polygon
Create a polygon in JavaFX by instantiating the class named Polygon which belongs to a package javafx.scene.shape within the start() method. You can instantiate this class as follows.
publicclassClassNameextendsApplication{publicvoidstart(Stage primaryStage)throwsException{//Creating an object of the class Polygon Polygon hexagon =newPolygon();}}Step 2: Setting Properties to the Polygon
Specify a double array holding the XY coordinates of the points of the required polygon (hexagon in this example) separated by commas, using the getPoints() method of the Polygon class, as follows.
//Adding coordinates to the hexagon
hexagon.getPoints().addAll(newDouble[]{200.0,50.0,400.0,50.0,450.0,150.0,400.0,250.0,200.0,250.0,150.0,150.0,})
Step 3: Adding Polygon Object to Group
In the start() method, instantiate the class named Group, which belongs to the package javafx.scene, by passing the Polygon object, created in the previous step, as a parameter value to its constructor.
Group root =newGroup(hexagon);Step 4: Launching Application
Once the 2D object is created, follow the given steps below to launch the application properly −
- Firstly, instantiate the class named Scene by passing the Group object as a parameter value to its constructor. To this constructor, you can also pass dimensions of the application screen as optional parameters.
- Then, set the title to the stage using the setTitle() method of the Stage class.
- Now, a Scene object is added to the stage using the setScene() method of the class named Stage.
- Display the contents of the scene using the method named show().
- Lastly, the application is launched with the help of the launch() method.
Example
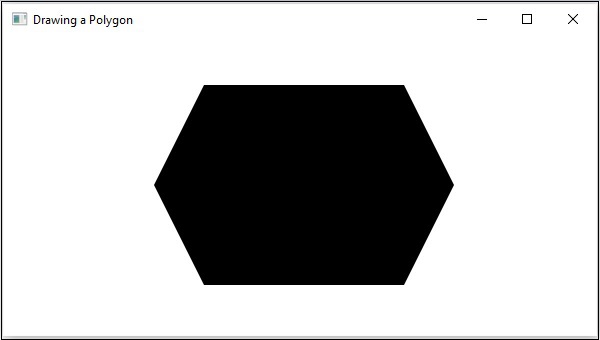
Following is a program which generates a Polygon (hexagon) using JavaFX. Save this code in a file with the name PolygonExample.java.
importjavafx.application.Application;importjavafx.scene.Group;importjavafx.scene.Scene;importjavafx.scene.shape.Polygon;importjavafx.stage.Stage;publicclassPolygonExampleextendsApplication{@Overridepublicvoidstart(Stage stage){//Creating a Polygon Polygon polygon =newPolygon();//Adding coordinates to the polygon
      polygon.getPoints().addAll(newDouble[]{200.0,50.0,400.0,50.0,450.0,150.0,400.0,250.0,200.0,250.0,150.0,150.0,});//Creating a Group object  Group root =newGroup(polygon);//Creating a scene object Scene scene =newScene(root,600,300);//Setting title to the Stage
      stage.setTitle("Drawing a Polygon");//Adding scene to the stage
      stage.setScene(scene);//Displaying the contents of the stage
      stage.show();}publicstaticvoidmain(String args[]){launch(args);}}
Compile and execute the saved java file from the command prompt using the following commands.
javac --module-path %PATH_TO_FX%--add-modules javafx.controls PolygonExample.java
java --module-path %PATH_TO_FX%--add-modules javafx.controls PolygonExample
Output
On executing, the above program generates a JavaFX window displaying a polygon as shown below.
Example
Now, let us try to draw polygons other than a hexagon, say a rhombus. Save this code in a file with the name RhombusExample.java.
importjavafx.application.Application;importjavafx.scene.Group;importjavafx.scene.Scene;importjavafx.scene.shape.Polygon;importjavafx.stage.Stage;publicclassRhombusExampleextendsApplication{@Overridepublicvoidstart(Stage stage){//Creating a Polygon Polygon polygon =newPolygon();//Adding coordinates to the polygon
      polygon.getPoints().addAll(newDouble[]{300.0,50.0,450.0,150.0,300.0,250.0,150.0,150.0,});//Creating a Group object  Group root =newGroup(polygon);//Creating a scene object Scene scene =newScene(root,600,300);//Setting title to the Stage
      stage.setTitle("Drawing a Polygon");//Adding scene to the stage
      stage.setScene(scene);//Displaying the contents of the stage
      stage.show();}publicstaticvoidmain(String args[]){launch(args);}}
Compile and execute the saved java file from the command prompt using the following commands.
javac --module-path %PATH_TO_FX%--add-modules javafx.controls RhombusExample.java
java --module-path %PATH_TO_FX%--add-modules javafx.controls RhombusExample
Output
On executing, the above program generates a JavaFX window displaying a rhombus as shown below.

Leave a Reply